No Knead Large Dutch Oven Bread

No-knead large dutch oven bread is a recipe adapted for those that only own one large dutch oven.
I’m sure you all have heard of the no-knead miracle bread. Just in the last few months have I started making this bread. I avoided it due to the long rest period. Don’t be like me this recipe is amazing!
I only have one 5.5-quart dutch oven. All though absolutely divine, the original recipe just wasn’t enough to achieve a tall loaf in my pot.
I researched to see if anyone had tried doubling the recipe for a larger dutch oven. Yes! FrugallivingNW had achieved what I was looking for! No-knead large dutch oven bread would finally be mine!
No Knead Large Dutch Oven Bread
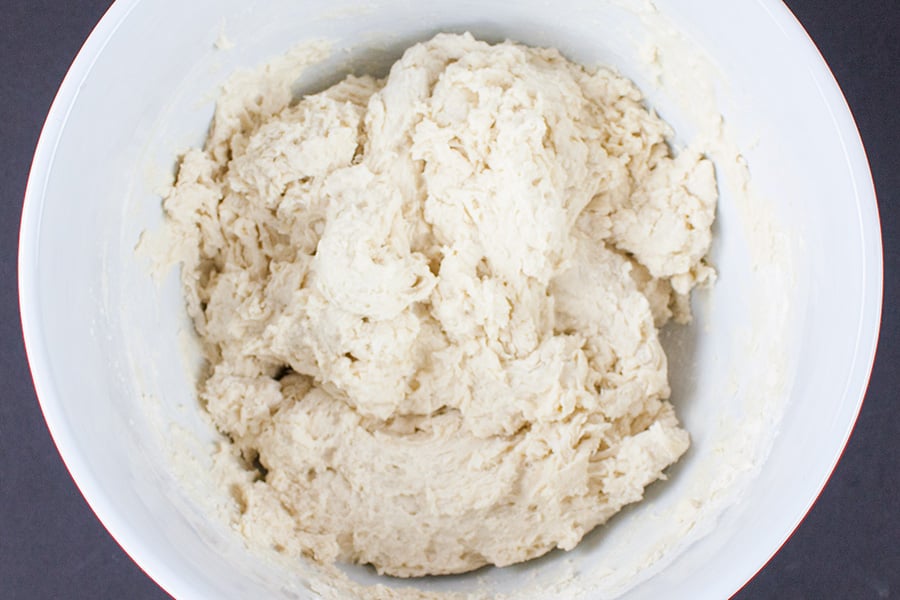
In a large bowl, combine the flour, salt, and yeast. Instant or active dry yeast can be used. Add the water and stir with a wooden spoon until all the ingredients are well incorporated; the dough should be wet and sticky.
Cover the bowl with plastic wrap. Let the dough rest 12 to 18 hours on the counter at room temperature.
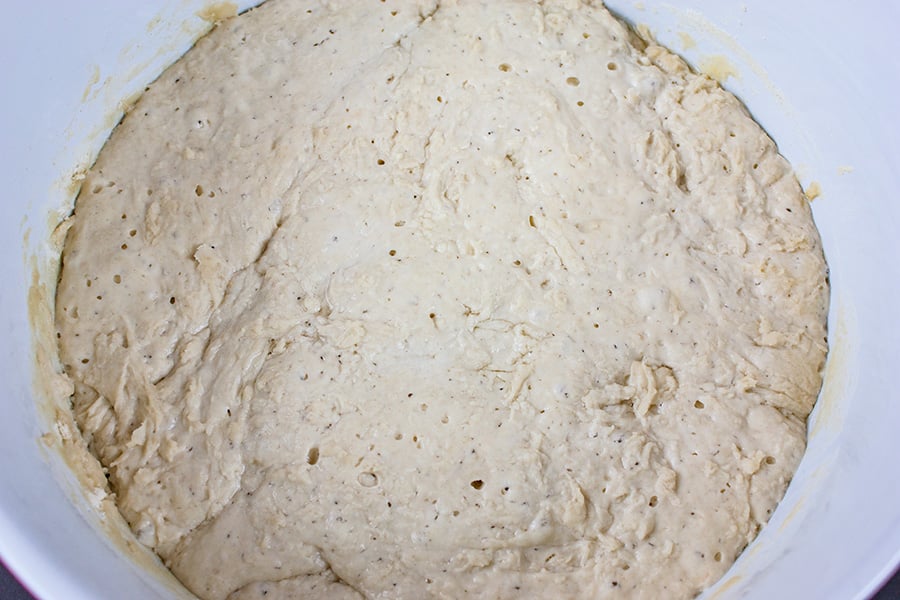
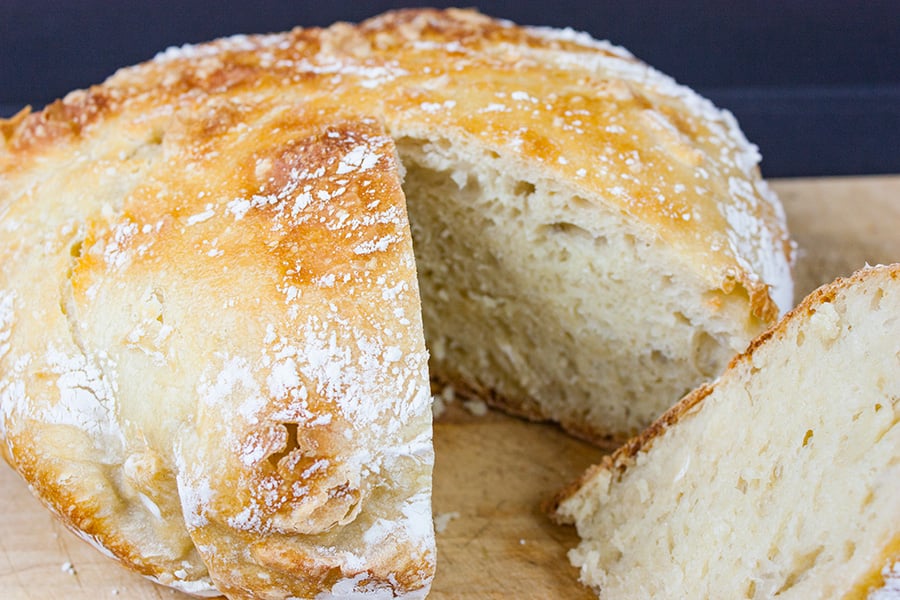
This is what it should look like after resting. The bread dough will smell yeasty, darken slightly and covered with small bubbles.
The dough is very sticky. When ready to bake, generously flour your hands and a work surface.
Place the dough on a work surface and sprinkle with more flour. Fold the dough over on itself once or twice and, using floured hands, tuck the dough underneath to shape the dough into a rough ball.
Place a large rectangle of parchment paper on a cotton towel and dust it with enough flour to prevent the dough from sticking to the parchment paper as it rises; place dough seam side down on the parchment paper and dust with more flour. Pull the corners of parchment paper around the loaf, wrapping it completely to keep a round shape. (I forgot a photo of this step, sorry.)
Allow to rise about 2 hours.
Preheat the oven to 425 degrees F.
While the oven is heating place an oven-safe cast iron dutch oven with lid in the oven to heat.
Once heated, carefully pull out the dutch oven and remove the lid. Untie the dough and carefully slide the parchment with the dough down into the dutch oven.
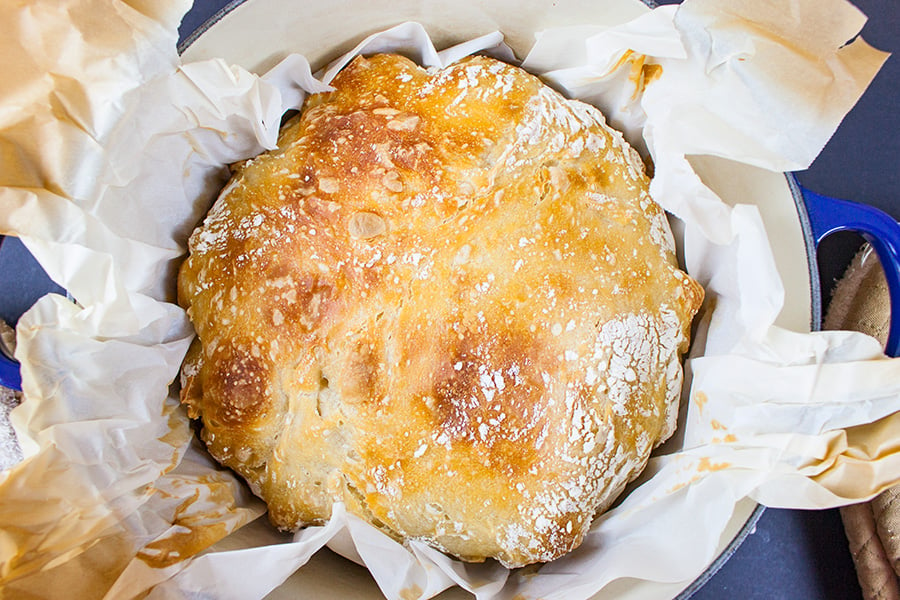
Cover with lid and bake for 40 minutes. Uncover and continue baking for 10-15 more minutes, until the crust is a deep golden brown. ( baking times can vary) The internal temperature of the bread should be around 200 degrees.
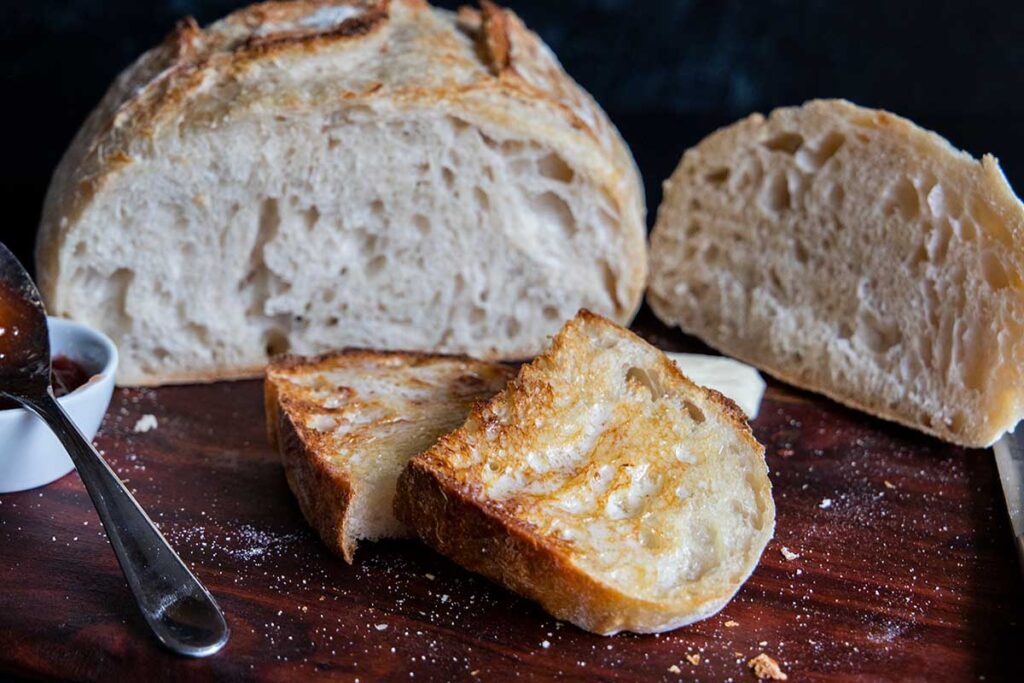
When done carefully use the parchment as handles to remove the loaf of bread to a wire rack to cool.
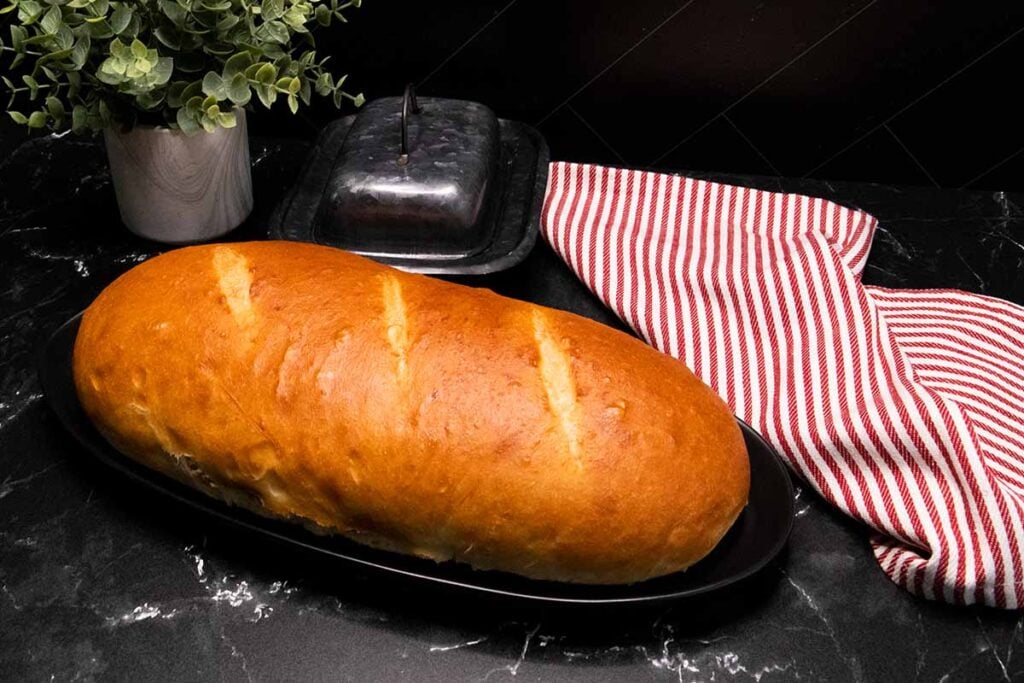
But not too long because you are going to want to slather a ton of butter on a warm slice of fresh-baked bread.
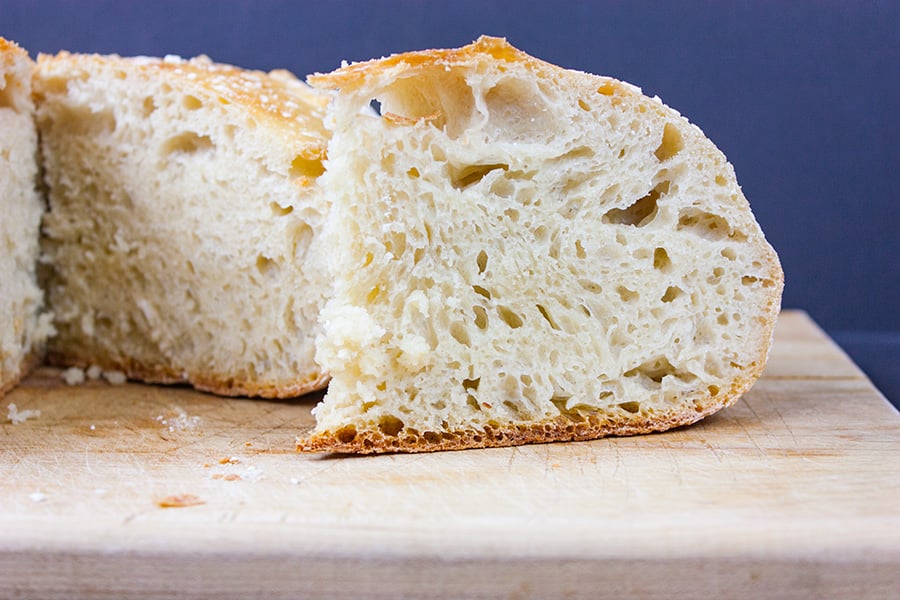
This no-knead large dutch oven bread has a crusty exterior and a slightly chewy interior. Perfection!
Other Delicious Bread Recipes

No Knead Large Dutch Oven Bread
Ingredients
- 6 cups bread flour, recommended (or all-purpose flour, plus more for work surface)
- 1/2 teaspoons instant or active dry yeast
- 2 1/2 teaspoons salt
- 2 2/3 cups cool water
Instructions
- In a large bowl, combine the flour, yeast, and salt. Add the water and stir until all the ingredients are well incorporated; the dough should be wet and sticky. Cover the bowl with plastic wrap. Let the dough rest 12-18 hours on the counter at room temperature. When the surface of the risen dough has darkened slightly, smells yeasty, and is dotted with bubbles, it is ready.6 cups bread flour, recommended, 1/2 teaspoons instant or active dry yeast, 2 1/2 teaspoons salt, 2 2/3 cups cool water
- Heavily flour your hands and a work surface. Place dough on work surface and sprinkle with more flour. Fold the dough over on itself once or twice and, using floured fingers, tuck the dough underneath to form a rough ball.
- Place a large rectangle sheet of parchment paper on a cotton towel and dust it with enough flour to prevent the dough from sticking to the parchment paper as it rises; place dough seam side down on the parchment paper and dust with more flour. Pull the corners of parchment paper around the loaf, wrapping it completely. Do the same with the towel. Let rise for about 2 hours, until it has doubled in size.
- After about 1 1/2 hours, preheat oven to 425 degrees. Place a 6-8 quart heavy covered pot, such as a cast-iron Dutch oven, in the oven as it heats. When the dough has fully risen, carefully remove the pot from oven. Unwrap the towel and parchment paper from around the dough carefully lift the parchment and place in the pot. Shake pan once or twice if the dough looks unevenly distributed; it will straighten out as it bakes.
- Cover and bake for 40 minutes. Uncover and continue baking for 10-15 more minutes, until the crust is a deep golden brown. The internal temperature of the bread should be around 200 degrees. You can check this with a meat thermometer if desired.
- Remove the bread from the pot and let it cool completely on a wire rack before slicing. ( I can never wait for complete cooling)
Love this bread and have made
It many times: thank you! I just got a sour dough starter and wonder if I could incorporate it into this recipe and if so, how so? Thanks again!
Hi, Chelsee. I have never tried adding my starter to this recipe. Give this article a read and see if that helps.
I make this recipe a couple times a month. The family LOVES it! Perfect to go with anything. Leftovers can be grilled or toasted with yummy results. My oven element just burned out… so we’re going to try this on the webber in the Dutch oven. 10 briquettes on the bottom and 9 on top is supposed to be 400 degrees. Wish me luck. 🙂
Thank you! Please check back and let us know how it worked out on the Weber. We would love to know the results.
Turned out perfect with 2 cups all purpose, 2 cups bread and 2 cups whole wheat mixed! Thank you!
Instead of the towel for rise with parchment paper, I place the dough on parchment paper and place in a round bowl to keep its shape and then transfer to Dutch oven to bake after the rise. It worked with the 3 cups of over recipe so I think it will with the 6 cups of flour recipe. Wish me luck as I have not made it yet
I make this recipe regularly, although upon occasion I divie the loaf after the second 15 minute rise and place the two sections in two loaf pans. Our children like it better for slicing sandwiches for work and school Also I vary the recipe by using 1 cup of althernative fllour (whole wheat, rye, mixed grains, etc.) along with 5 cups bread flour. I always use bread flour, but some say it makes no difference.
Great tips! Thanks, David.
I was wondering if I could add sunflower seeds and/or pumpkin seeds to this bread. Any suggestions as to timing of this type of add-in? I have made this bread with ALL whole wheat flour as I had a lot of it to use up. Turned out very nicely. Especially good for toast, or grilled cheese type of sandwiches. Thank you!
Hi, Kat. I would recommend adding the nuts with all the other ingredients during the mixing process. We are happy to hear you enjoyed the bread!!!
Hi there, I have made the small loaf size (3 cups flour, etc.) and added 1/2 cup mashed potatoes….hoping the large one comes our good….going to add 1 cup mashed potatoes…..
Let us know how it turned out!
I make and share this often: thank you!
I tried this using whole wheat flour. Came out very dense and heavy. Is there something that should be adjusted to fix that?
Hi, Skip! I’ve never made this recipe with whole wheat flour. Try this one No Knead Whole Wheat Bread
This Recipe calls for 1\2 tsp dry yeast? Is that right???? I just made the dough using these measurements. Please let me know asap if they’re correct.
Thank you in advance
Michelle
Yes, that is correct.
Is the level of yeast correct? Also is cold water right? I never make bread but I always heard yeast needs warm water. Thank you for your time
Yes
Please disregard my last email. I dont know what I was thinking! Lo
Sorry. Have a good day.
Can this recipe be used with long rise method? Can I leave overnight and bake the next day or will it use up all of the yeast?
FANTASTIC recipe! The last bread I made (in my bread machine) was inedible. I have a new dutch oven, and tried this recipe. Let me tell you, my expectations were LOW, because I’m a walking disaster in the kitchen. THIS BREAD IS PERFECT!!! Thank you, thank you, thank you!!!
So happy to hear it, Jeri!! Bread is so much more awesome when you make it yourself, isn’t it?!
Please help. Will this recipe work in a 4 1/2 quart oval cast-iron Dutch oven? What changes to the ingredients do I need to make? Or, should I buy a larger Dutch oven?
Yes, this should work in a 4 1/2 qt dutch oven.
The best bread I’ve made yet! Perfection.
I found our old cast iron dutch oven and decided to give this recipe a shot. It was excellent, has a really nice sourdough taste and golden colour. Will definitely be making again!
I have made a lot of bread, grown my own sourdough culture, and tried many dozens of recipes over the years. This may be the best AND easiest bread EVER. I mean, you never make the same bread twice, but I don’t see how this could go wrong. SOOO flavorful and chewy and soft! THANK YOU!
Hi, Sarah! We are so happy you enjoyed the bread!!! I too have tried numerous recipes and sourdough culture, this recipe is awesome!
I know this is an older post, but thank you so much for having posted it!!! I baked bread for the first time in my life and it came out incredibly well!! My grocer’s bakery department has lost a customer for life.
Hey, Ryan! We are so happy to hear you loved the recipe, it’s one of our favorites too! Thank you so much for coming by to tell us.
Half a teaspoon of yeast? Really? All other recipes are calling for 2 and 1/2 tsp of yeast for 3 cups of flour – is yours a typo?
Yes, really. It’s not a typo.
This looks delicious! It looks very dense, which is great for grilled cheese. Thank you for sharing at the Creative Muster. Robin | Fluster Buster
Thanks, Robin! It’s PERFECT for grill cheese and toast!
this would be great to go along with any great casserole or soup something we often eat during winter months thanks for sharing
come see us at https://shopannies.blogspot.com